skip to main |
skip to sidebar
All three phones unveiled by Nokia today are emphasizing on Messaging and Social networking. Nokia C3 is a first S40 series Full QWERTY keyboard phone. Looks very much like Nokia E63 but comes with additional features like WLAN (Wi Fi) and as said offers a social network interaction right from Homescreen.Nokia C3 also comes with Ovi Mail and Ovi Chat, meaning first time users can set up email and chat accounts straight from the device, without the need for a PC. The 2.4 inch screen with resolution of 320×240 offers a QVGA display. The 2MP camera has 4x digital zoom which is fair enough. Offers a support of 8GB Memory card. The Nokia C3 is expected to be available in the second quarter of 2010 in a variety of appealing colors, including golden white, slate grey and hot pink. Price range as specifies is 96 Euros and will be available in India not above 6,750 INR.
1. Robo 2. Simha 3. Maryada Ramana 4. Brindavanam 5. Ye Maya Chesave 6. Darling 7. Betting Bangaraju 8. Leader 9. Adhurs 10. Rakta Charitra-I 11. Don Seenu 12. Bindass 13. Namo Venkatesa 14. Vedam 15. Jhumandi Nadam 16. Andari Bhanduvaya 17. Shambo Siva Shambo 18. Sneha Geetam 19. Yamudu 20. Bhemili Kabadi Jattu
Windows is a operating system which is realeased by Microsoft and user account is one of the best feature.There can be many users for a single computer which is installed with windows every one can have their own personal settings and they can maintain their personal files. now if a user wants to log inside another users account then he should be aware of the password of the other user. so every user user has a password for their account and still in this busy world we might even forget the password which we set to our account and if we forget the password then we can’t log inside our account to avoid such situation. we can create a password reset disk by following the below ways :Windows Vista :
- Click on Start and then Control Panel.
- Click on the User Accounts and Family Safety link.Note: If you’re viewing the Classic View of Control Panel, you won’t see this link. Simply double-click on the User Accounts icon and proceed to Step 4.
- Click on the User Accounts link.
- In the task pane on the left, click the Create a password reset disk link.
- When the Forgotten Password Wizard window appears, click NextNote: You will need some kind of portable media before being able to create a password reset disk. This means that you will need a flash drive or a floppy disk drive and blank floppy disk.
- In the I want to create a password key disk in the following drive: drop down box, choose the portable media drive to create a password reset disk on.Click Next to continue.
- With the disk or other media still in the drive, enter your current account password in the text box and click Next.
- Windows Vista will now create the password reset disk on your chosen media.hen the progress indicator shows 100% complete, click Next and then click Finish in the next window
- You can now remove the flash drive or floppy disk from your computer.abel the disk “Password Reset” and store it in a safe place.

Windows XP :
- Click on Start and then Control Panel.
- Click on the User Accounts link.Note: If you’re viewing the Classic View of Control Panel, double-click on the User Accounts icon.
- In the pick an account to change area of the User Accounts window, click on your Windows XP user name.
- In the Related Tasks area on the left, click the Prevent a forgotten password link.
- When the Forgotten Password Wizard window appears, click Next Note: You will need a floppy disk drive and a blank floppy disk.
- On the next screen, verify that a blank floppy disk is inserted in your floppy disk drive.
Click Next to continue. - With the disk still in the drive, enter your current account password in the text box and click Next.
- Windows XP will now create the password reset disk.
When the progress indicator shows 100% complete, click Next and then click Finish in the next window. - You can now remove the floppy disk from your computer.
Label the disk “Password Reset” and store it in a safe place.
UAC is one of the very good feature in windows vista. it improves the security in the computer. this UAC will alert the user regarding what they are doing. Sometimes spywares and adwares come into our computer with out our knowledge but if we are going to have UAC enabled then we will know what enters our ccomputer. still this UAC is also not needed in some case like a presentation or sometime the home users finds this to be more annoying coz they have keep on cliking. anyway i have given all the 4 methods to disable UAC.Method : 1Using ‘ msconfig ‘1. Launch ‘msconfig' from run menu2. Click the Tool tab and select the 'Disable UAP'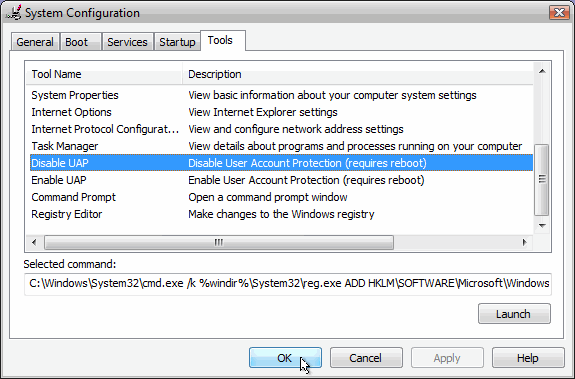 3. Press the Launch button4. A command window will open when the command is done we can close the window.5. Now Reboot the sys to take effect.6. IF we want to enable the UAC then follow the same steps but by selecting the ‘Enable UAP‘ line and click on the Launch button.Method : 2Using ‘ RegEdit ‘1. Open Registry Editor.2. In Registry Editor, navigate to the following registry key:
HKEY_LOCAL_MACHINE\Software\Microsoft\Windows\CurrentVersion\Policies\System3. Locate the value : EnableLUA4. Change the Value to be ’0′5. To enable the UAC change the value to be ’1′Note : Before doing any changes to the registry you should have a valid backup of the registry.Method : 3Using Group Policy1. If using Local Group Policy you’ll need to open the Group Policy Editor (Start > Run > gpedit.msc) from your Vista computer.If using in AD-based GPO, open Group Policy Management Console (Start > Run > gpmc.msc) from a Vista computer2. In the Group Policy Editor window, browse to Computer Configuration > Windows Settings > Security Settings > Local Policies > Security Options.In the right pane scroll to find the User Access Control policies.You need to configure the following policies:3. Reboot the computer.Method : 4 Using Control Panel1. Open Control Panel.2. Under User Account and Family settings click on the “Add or remove user account”.3. Click on one of the user accounts, for example you can use the Guest account.4. Under the user account click on the “Go to the main User Account page” link.5. Under “Make changes to your user account” click on the “Change security settings” link.6. In the “Turn on User Account Control (UAC) to make your computer more secure” click to unselect the “Use User Account Control (UAC) to help protect your computer”. Click on the Ok button.7. You will be prompted to reboot your computer. Do so when ready.8. In order to re-enable UAC just select the above checkbox and reboot.


